6.0 /6L80E SWAP IN A CJ 8
Vehicle: 1981 CJ 8 Scrambler
This Jeep sat in storage for several years and had a LT1 swap. However, it never ran right and after several attempts to get it right the customer decided to cut bait and do an LS swap.
SWAP DETAILS
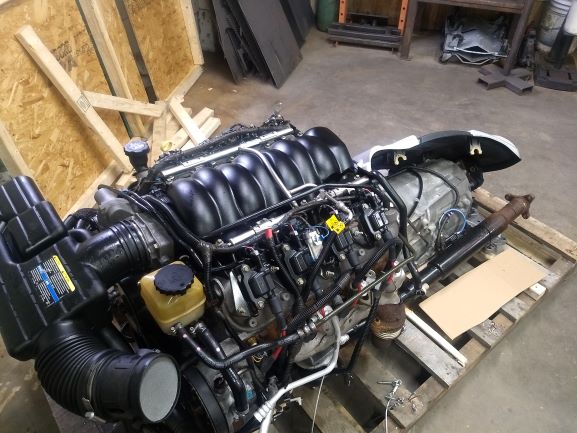
ENGINE: 6.0 LS - L76 from a 2009 Pontiac G8
TRANSMISSION: 6L80e Transmission from the same car
TRANSFER CASE: Original CJ8 Dana 300
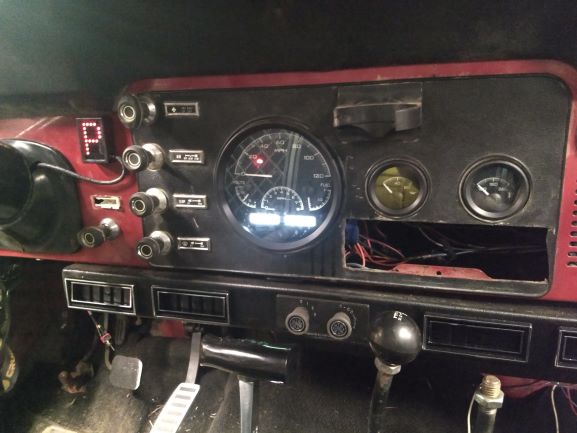
ADDITONAL REQUESTS: New Heating and AC, Crusie Control, Dakota Digital Gauge Set, Tap Shift
Throughout this page, I will mention parts that I use in this swap. A spreadsheet will be at the bottom of the page detailing the parts purchased with part numbers where available.
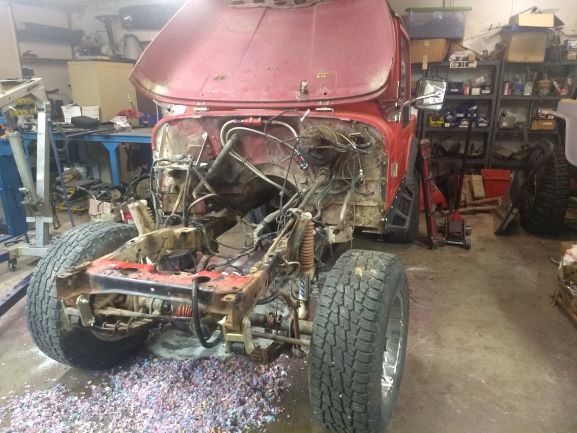
TEARDOWN
Teardown began with removing the grille, fenders, radiator, engine, transmission, transfer case, driveshafts and associated bits.
ENGINE and TRANSMISSION
Engine and transmission were purchased on EBAY and had approximately 40k miles on it. This engine came much more complete than some previous purchases.
Some components to ask about when purchasing these setups:
- Typical items: alternator, water pump, AC compressor, power steering pump, exhaust manifolds, starter
- Engine Wiring Harness
- ECU
- The second connector for the ECU - This connector often does not come with the engine harness as it is not part of the engine harness, its actually part of the body harness and there is a large connector on the engine harness that connects the two harnesses. The yard pulling the harness may not want to give you the connector with the engine as they typically do not want to cut connectors off of a harness but it doesnt hurt to ask! Being that it usually isnt provided, those reworking wiring harnesses are familar with this and can often provide this connector. Be sure to talk to with them though, as charges for this connector will vary. I've had one GIVE it to me free of charge, and another that wanted to charge $70 for the connector.
- MAF (Mass Air Flow) Sensor - This is connected to the large plastic intake shown in the picture below and sometimes can also be left out when they send the engine to you.
- Exhaust Collectors - These are the pieces that bolt to the bottom of the manifolds and connect to the rest of the exhaust. These also have the O2 sensors in them. Usually I will install headers so I dont need them but if you're using the stock manifolds it would help to already have the collectors and not have to find some.
- O2 Sensors - As mentioned above typically these are with the collectors.
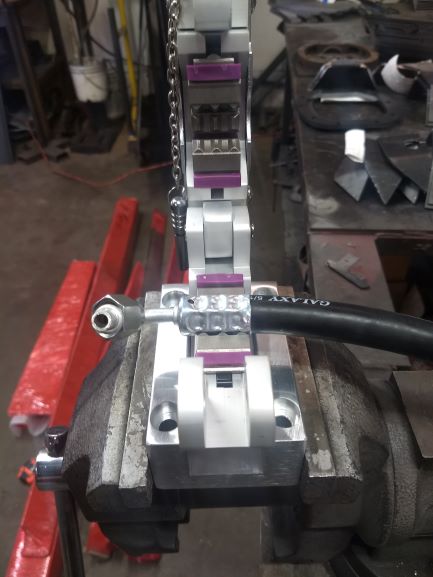
- Power Steering Hoses- I've found its more critical to have the high pressure hose, and not critical to have the low pressure hose. The high pressure hose I typically will take along with the stock Jeep high pressure hose and have a hydraulic hose place add some compression fittings to connect the two. This way the hoses fit well both on the engine end and the vehicle end. For the low pressure hose I typically use a stock Jeep hose.
- Transmission Cooler Lines - I usually use a Bowler Manifold and AN braided hose. If you are trying to save money, you could reuse the stock lines. However I have seen a push on hose with hose clamps blow off of a stock line transmission cooler line on a LS swap.
- Heater Hoses - Same scenario, I typically replace the heater hoses and for one of the hoses have to use an adapter to go from 3/4 to 5/8. But if you're looking to save money you could probably reuse some of the hoses.
- Engine Cover - It is personal preference on whether you want to use the engine cover or not, but I have had engines come without it so if you are wanting it you should request it.
These are items that can end up coming with the engine and transmission but I do not use. This doesnt mean that they might not be useful or could be used if swapping into something other than a Jeep.
- Transmission Mount - Being that these last couple 6.0 and 6L80s came out of cars I purchase a mount with the transfer case adapter.
- Radiator Hoses - These hoses are not close to matching up to a Jeep radiator so Ive always purchased the Gates hoses and cut them to work.
- Driveshaft - Obviously not used.
- Intake Tube - Not exactly sure what to call this... it's large, plastic and connects the MAF to the intake. Maybe you could get it to work but Ive never tried to fit it into a Jeep.
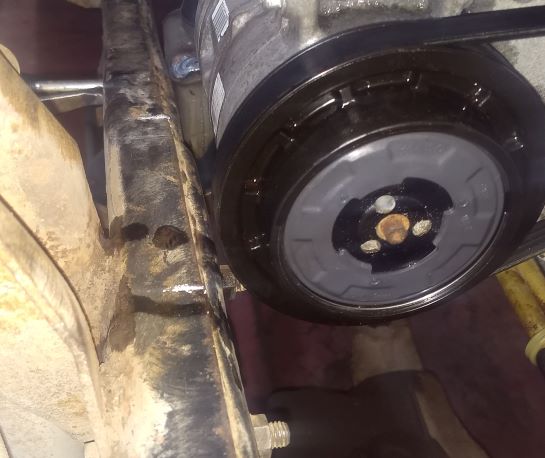
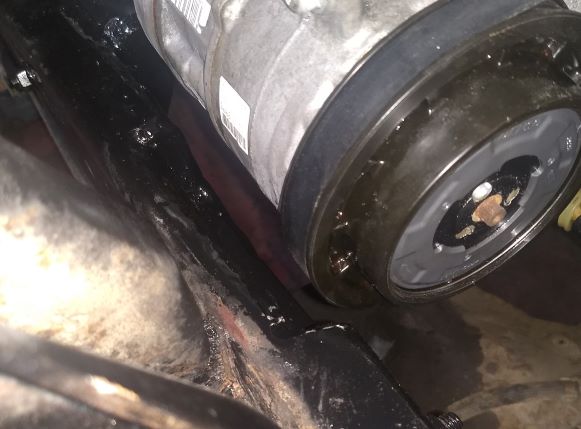
- AC Lines - I always buy a new manifold and make new lines as it would be difficult to make the stock AC lines work.
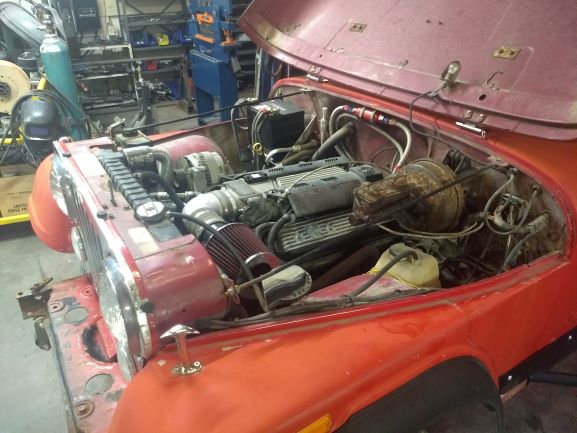
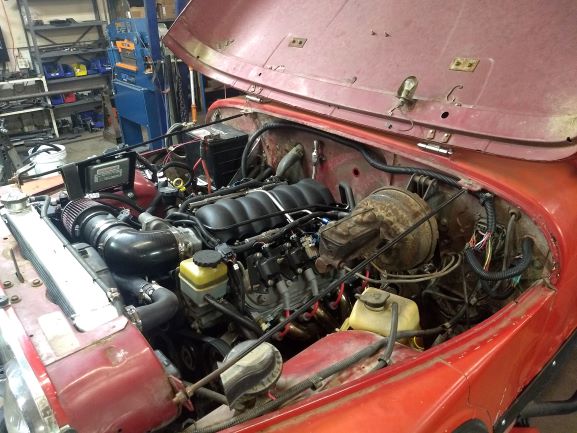
ENGINE PREP AND INSTALL INFO
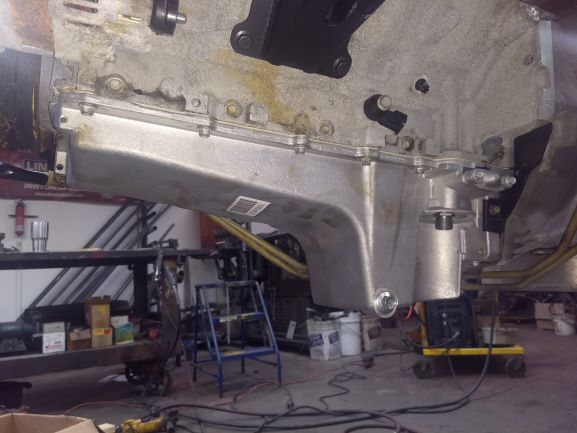
To prep the engine we removed the exhaust manifolds, harness, hoses and anything else that may get in the way during placement. Prior to trying to place the engine we had to replace the oil pan, this is because the engine originally came out of a car and for clearance fo the front axle as well as the crossover for the exhaust we switched to a muscle car style oil pan from Chevy Performance PN 809-19212593.
Original G8 Oil Pan
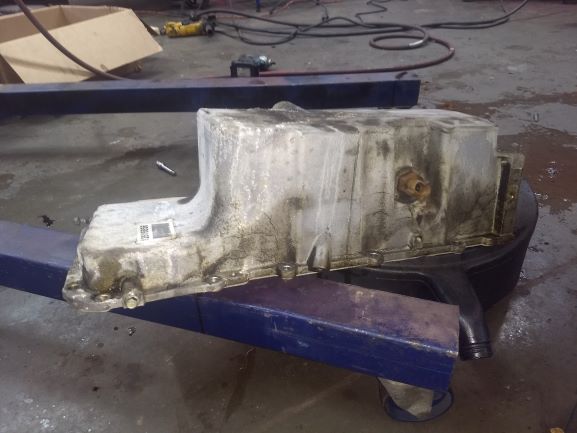
Muscle Car Style Oil Pan
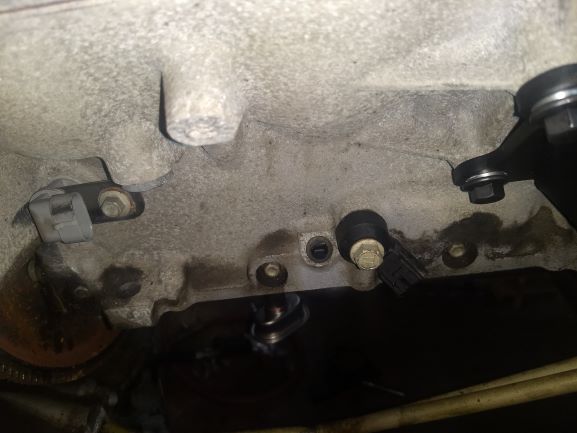
With the original oil pan the dip stick went directly into the pan. When switching to the muscle car style pan the dip stick will now need to use the stock truck location which is in the block. The block will have a plug in the hole that you need to knock out. You will need to take the oil pan off to knock this plug out so be sure to do it before you install everything.
Original With Dip Stick in Pan

Truck Location in the Block (Its the hole left of the black sensor)
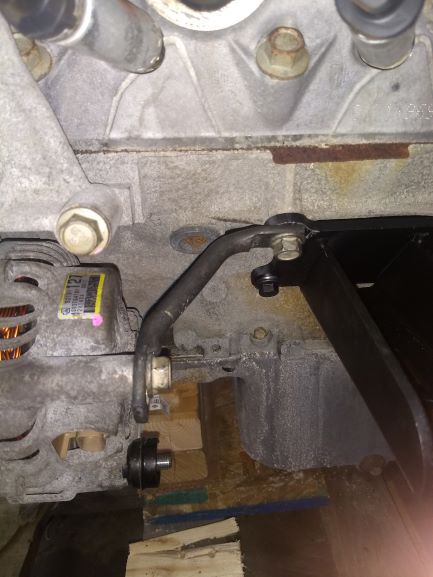
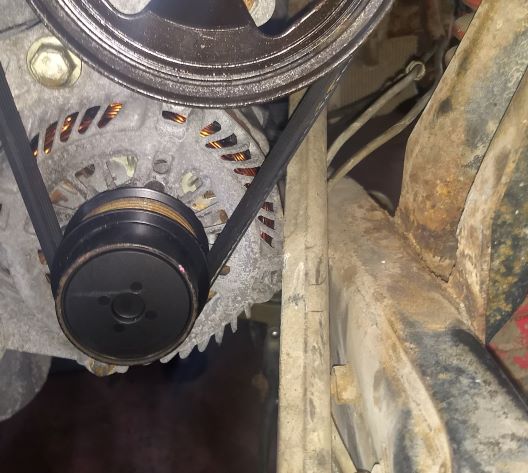
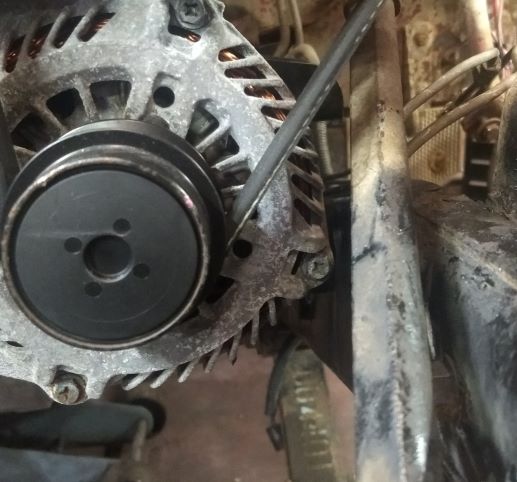
For motor mounts we used Advanced Adapters 713088 mounts. Taboo Customs is a dealer for advanced adaptors so if you would like a quote on these mounts please contact us. When using these motor mounts we did find that the bar that runs from the alternator to the motor mounts didnt fit very well. An additional hole had to be added to make this bar work.
Prior to placement of the engine we tried to estimate the correct placement to get the transfer case back in nearly the same position as before with the LT1. We did this so we could hopefully reuse the transfer case shifters and the drive shafts. To do this we had to measure the LT1 and transmission from the adapter to the motor mounts then compare to the LS and transmission. We found that the motor mounts would need to move back about 3" from where they were with the original LT1. This in the end did work great and we were able to reuse both the transfer case shifter and driveshafts. In addition to this we had to look at the placement from left to right in the jeep. With the LS centered in-between the frame we found that the steering shaft was within .25" of the alternator. This is too close and the engine needed to move over at least .5" however to do this meant the AC pulley would be within .25" of the frame rail on the passenger side. After evaluating options including removing the AC, we decided that we would notch the frame around the AC so that we could move the engine over. In the end the goal with this was to make the frame stronger than it was orginally.
BEFORE
AFTER
TRANSMISSION PREP
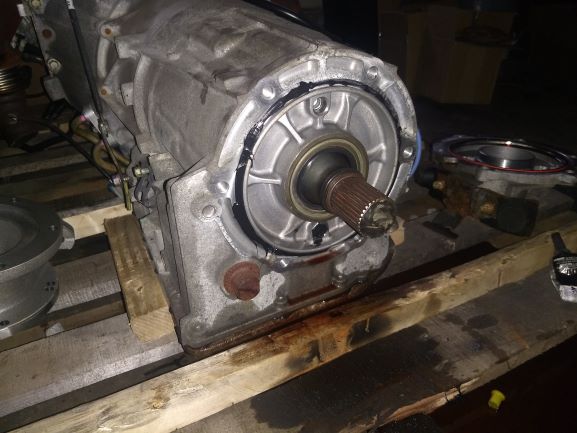
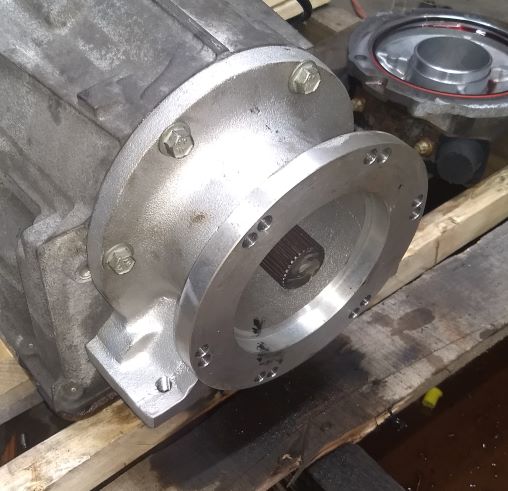
The engine came with a 2wd 6L80E. Initially, that might sound like a lot of work; But suprisingly when used with the Dana 300 is a fairly simple modification to adapt. The first thing to understand is what side we want the transfer case drop to be on. Since the jeep is currently retaining the stock axles the transfer case drop will be as it normall is on the passenger side. This does make the setup easier beecause when you need to flip the transfer case with the dana 300 there are issues with the shift rods. If you do need to flip the transfer cas you can solve this issue by flipping the shift rods to what used to be the bottom of the transfer case however it is difficult to find a kit to do this. We are in the process of developing a kit for this and if you are interested please contact us. Since the drop is on the passenger side this is not an issue. To mount the transfer case we chose Advanced Adaptors kit PN 50-9620, Taboo Customs is a dealer for advanced adaptors so if you would like a quote on these mounts please contact us. First step is swaping the input shaft on teh Dana 300 which is relatively easy and there are multiple writeups/videos on the internet that details this. With this kit a couple of changes have to be made to the transmission after removing the 2wd adaptor. The shaft has to be shortened and the shaft has to have the large O ring removed. Then the area the O ring is ground down so the transfer case can slide far enough on. To figure out how far to cut the shaft down you can mount the transfer case adapter and then measure the the distance on the transfer case that the input shaft sticks out and the depth of the hole in the shaft.
Transmission with rear cover removed, part of the end of the shaft has already been cut off.
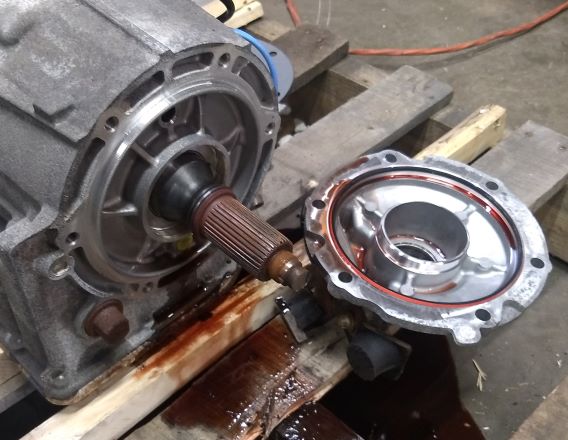
Shaft shortened to fit the transfer case. Plugs installed in holes above and below shaft.
Adapter installed
Test fitting transfer case to check clearances

FUEL SYSTEM INFO
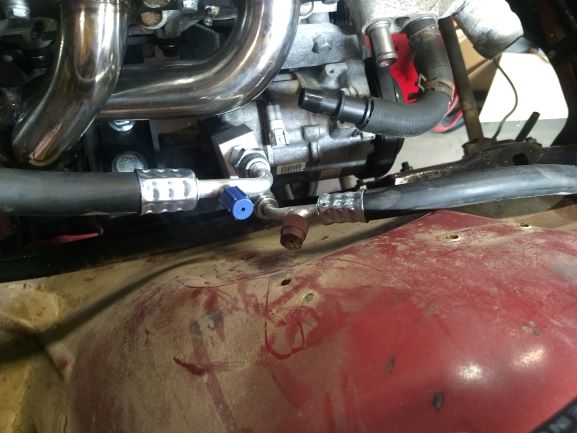
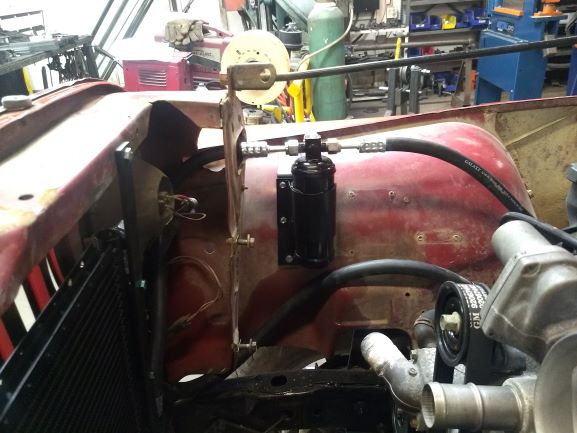
The fuel system for this year engine needs approximately 58 psi and is refered to as a returnless system, which really just means the regulation/return is not up by the fuel rail but somewhere else often at the filter or even in the tank. Originally the jeep had an external pump for the LT1 which we did initially reuse. We coupled this with a corvette filter/regulator and stainless braided AN-6 fuleline. I prefer using the AN lines and fittings due to the high pressure eliminating some of the worry of clamped on hoses coming apart. The exhaust and the fuel lines both run down the drivers side of the jeep so we did our best to try to put the lines in a location to minimize heat issues, coupled with using the stainless lines to reflect some heat, vapor lock should not be an issue. Upon getting the Jeep going, we found that the pump worked but was very noisy, and the sending unit for the fuel gauge did not work. Finding these issues, we decided to rework the system between the tank and filter. To do this we went with a Novak CJ combo in-tank fuel injection pump and sending unit. Fuel wise this setup worked very well. It is quieter and the pump should be able to run cooler. However getting the Dakota Digital guages to work was another story, that is covered under the gauges section.
Due to pressure, I recommend purchasing the correct fittings to mate up to the stock fuel rail and other locations

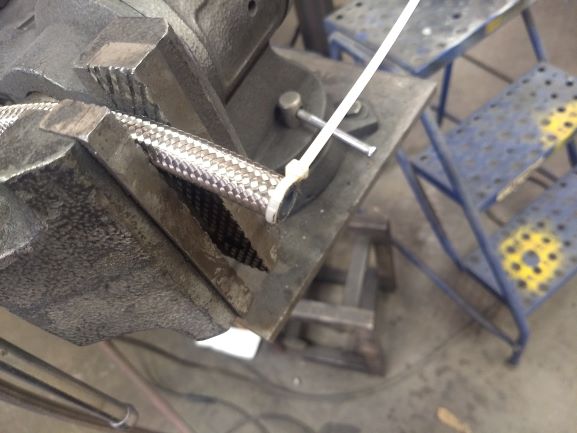
For fuel line I typically use stainless braided hose. When cutting stainless hose I have found that it is best to put a zip tie around the hose where you want to cut it, then cut right next to the zip tie. This helps to keep the hose from fraying. 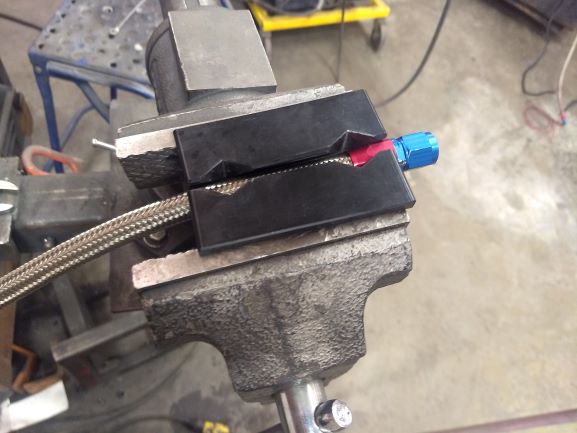
COOLING SYSTEM INFO
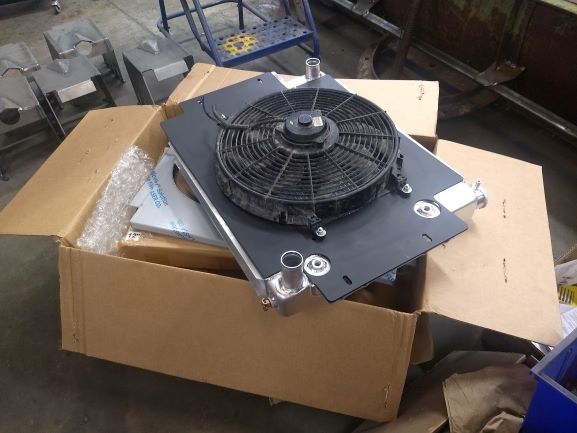
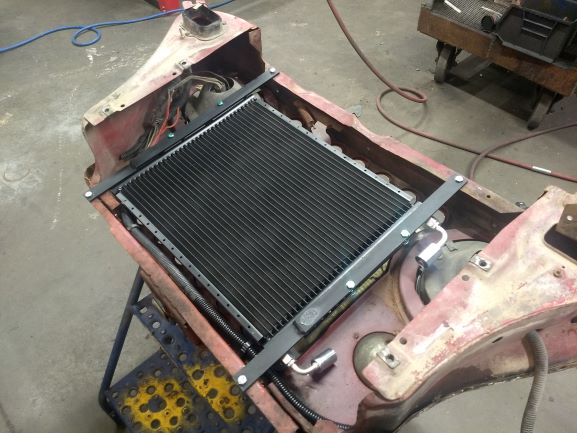
Obviously one of the main things with a V8 swap is making sure you can keep the engine cool. For this swap we went with a bolt in Northern Radiator 20504 and initially a 2-fan shroud and fan setup. However, upon recieving the radiator and looking at installing the shroud and fans we found that due to the transmission cooler fittings being on the side of the radiator instead of the bottom of the radiator...the shroud and fans would not fit. We ended up reusing the original single 16" fan and designed a fan shroud. If you find yourself using this style of radiator and in need of a fan shroud, please check our online store or e-mail us to purchase a shroud.
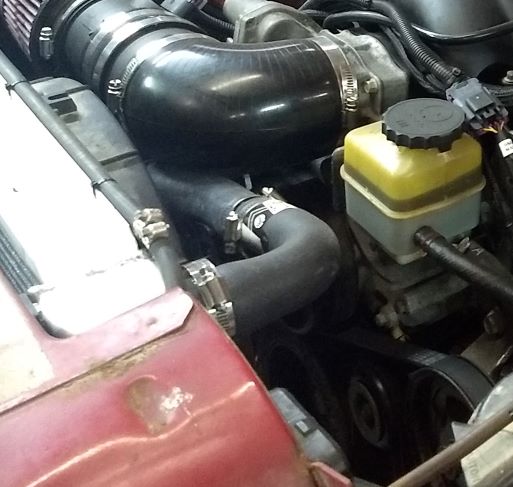
For radiator hoses I purchased Gates 20843 & 21706 hoses. These are not direct fit and require modification. The upper hose ends up being split in the middle, on some LS swaps this is where I have installed an additional temperature sensor. The lower hose is cut down to fit and is a little more difficult as its not as good a fit as the top, there may be other hoses that fit better but I have not yet found one.
Upper Hose
HVAC
This customer wanted AC in his jeep so he did some research and decided he wanted to use the Jeep Air combination heater/AC. This system replaces the stock heater box and mounts under the dash.
This system from Jeep Air has its pros and cons. The AC instructions and parts of this were pretty good and the couple of times I did have to call Jeep Air they were helpful when my question was on how the system worked and parts I needed to adapt the system to the compressor. The downside was the instructions and parts provided to mount the system. The only mounts provided mount the system to the bottom lip of the dash. This system is not very light and with the wheeling this jeep is going to do that mounting would not last long. I ended up making three new brackets to mount the system, two larger stronger brackets to the dash and one in the back to the firewall. In addition to this there was nothing clear to install the control cable for the defrost, I talked with them a couple times and they gave me instructions but for several reasons these would not work so I ended up making my own.
To install this system you do have to make air conditioning hoses, the kit comes with hose and ends but you will have to have the hoses made or make them yourself. Some time ago we bought a crimper to crimp the AC hoses.
I had similar issues with mounting the condensor to the Jeep grill. There were no Jeep specific brackets, just weak generic plates. I ended up making new brackets to mount the condensor.
We had to make clearance on the inner fender so that the charging hoses can be hooked up.
Dryer mounting location.
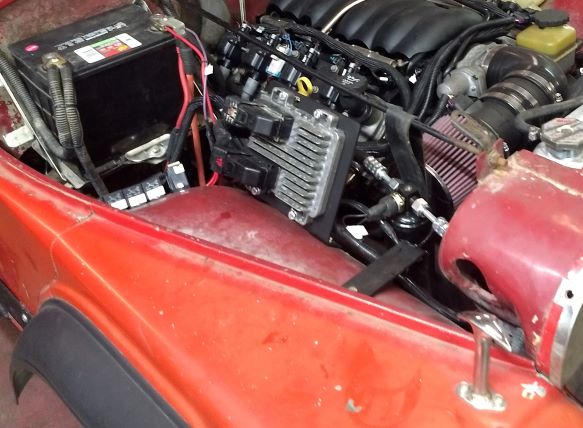
WIRING & ECM
One of what most see as the most daunting task of doing an LS swap is wiring. I've done enough 4.0 swaps where I take the harness and thin it down to just the wires. I need to know that having my harness reworked by someone else is money well spent. That and usually its coupled with having the ECM flashed which I am not capable of doing. You also then have someone else you can discuss issues with if you do have a wiring issue. I've used a few different people for harness work. Unfortunately the person I liked for my harness rework I was unable to get in touch with this time around. So for this one we used S&S Performance. The harness reworkers all have their little differences. This harness was done well but was a little more costly. The only thing about their harness I didnt like was on the relays. There were 4 relays and they were wired with just female spade connectors attached directly to the blades of the relay. Then the relays were taped together with electrical tape. I would have prefered to see relay sockets used.
My recommendation if looking for a wiring harenss reworker is to ask a few questions first. For one, if you dont get the second ECU connector you will need to ask about another connector. Lead time is also another big question these guys can be pretty busy and if you're on a tight timeline you might need to shop around based on lead time. Then you might also ask about type of fuse holder, relays and what input they need from you for the specific harness rework. Some other things to ask about are what connections are left to you to make and if any instructions come with the harness.
I can only think of two areas where you may have to give some input on how you would like the wiring of the harness. One is the OBD2 port, Ive had harnesses where the OBD2 port is wired right by the ECU and others where the connector is left loose and I have to make the connection. If you know about where you want the ECU and about where you want the OBD2 port you could then measure that distance for wire and ask the reworker to wire the OBD2 port with that much wire. The other issue I've ran into is on the MAF sensor. In one harness Ive had enough to make the connection on the passenger side of the jeep but on the latest one it was wired more towards the driverside and was about 16" away from where it needed to go for my intake. To deal with this you could rewire the MAF sensor or do as I did and just buy a jumper; They are available on Ebay.
In all if you are getting a harness reworked the wiring portion is really pretty simple. With this most recent build these are the following connections I had to make. Your harness may be slightly different:
Starter - This connection was not made to the new harness this connection came directly from the jeep harness to the solenoid on the starter.
Power Wire - This is the main power and ran from the fuse block directly to the battery.
Ignitition - This connection was from the Jeep harness to the new relay to provide power to the ECU.
Fuel Pump - This connection goes from the new relay to the fuel pump to provide power to the pump.
Brake Switch Signal - This is for automatic tranmissions and tells the PCM that the pedal has been pressed. This however can be odd. It wants to see 12 volts when the brake is not pressed. The problem is, for this jeep the brake switch is not set up that way. Because of that I had to add another relay. This relay was used to convert the 12 volt when brake pressed signal into a wire that has 12 volts when the brake isnt pressed. There are a lot of diagrams out there on the internet showing this.
Tach Wire - Optional; This is used to run a tach however it is a weak signal and ive struggled to get it to work correctly with some tachs such as the stock TJ tach. Even with using emulators, boosting the signal and playing with the setting ins HP Tuners.
Ground - Connected to the firewall where the battery ground also connects.
ECM FLASHING - For ECM flashing you will have to give the person doing the work some input. For instance, deleting the rear o2 sensors, any engine modifications, tire size and gear ratio and anything else they may ask for. Sometimes they will have a form you can follow and answer all the questions they need. For this build I also had to pull the TCU which is in the transmisson and send this off with the ECU to Speartech to get the proper programming for tap shift.
For mounting the ECM you will be somewhat limited. When doing the harness rework you end up with a ECU location at the passenger front of the engine compartment. To mount the ECM in the jeep I created a bracket that can be purchased in our store. This bracket comes flat and can be bent in a vise to be mounted in many different ways.
MISC
GAUGES
For gauges on this build we took the easy way out. We used a Dakota Digital VHX gagues along with their LS gauge integreation. This made the LS integration really easy, and is a great set of gauges giving you a lot of flexibility. The difficulty with the gauges came when trying to use the CJ fueal sending unit for the fuel gauge. The jeep already had an aftermaket tank but it was made of steel. The VHX gauge set needs to see the fuel sending unit ground isolated from any other ground. This was difficult for a couple reasons, for starts the pump ground and the sending unit ground were both just grounded to the body of the sending unit. Unfortunatly the sending unit ground was not able to be seperated from the body of the sending unit. We were able to add a isolated fuel pump ground. However the next issue we had was that the sending unit body would ground to the tank then to the frame. So we had to next isolate the sending unit itself from the tank. This took a couple of tries to get right but finally we were able to get it done.
CRUISE CONTROL
Cruise control integration with a drive by wire can be fairly easy as long as your willing to spend the money on a good system. We used a Dakota Digital system which plugs in between the throttle pedal and the harness and then needs a VSS signal to control the speed. With the drive-by wire LS engines there is one variation. If you buy a engine and harness from a Pontiac G8, your throttle pedal will be rectangular instead of oval. I've found that if you have this situation you can get in touch with Dakota Digital and they can point you to where you can get the correct integration harness. Your other option is to switch to the oval pedal and rewire your harness to the oval connector. On some setups we have had issues with getting the correct pulses from the VSS if you are having this issue Dakota Digital does have a signal interface unit that can help. For this build the VHX guages has an option for VSS output that is programmable and works with the cruise control.
SHIFTER
For the shifter for this Jeep we used a B&M Shifter, and the only issue we had was that due to the exhaust running down the driverside the stock bracket for the cable would not work. We were able to use one of the included brackets and move the cable so that it was at an angle instead of parallel to the ground. We did still have to modify the exhaust pipe a little to make clearance for the shifter bracket and then we wrapped the exhaust to keep some of the heat from getting to the shifter cable.
EXHAUST
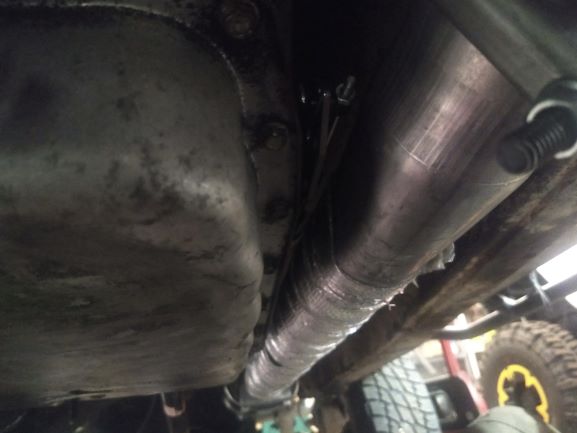
For exhaust we decided to do a single exhaust running down the driverside of the jeep. We wanted good flow so decided on using 2.5" tubes from each header running to a 3" main. For headers we used center dump headers, with a crossover just in front of the oil pan sump. For a muffler we used the Quiet Flow muffler from Vibrant. However, in this application it is not very quiet but does produce a nice sound. When I do my exhuast I will use tig rods and bend them to how I need the exhaust to run. Then I will take the rods to an exhaust shop and have them bend the tube.
TRANSFER CASE
We used the stock Dana 300 transfer case. It already had a twin stick installed and we were able to reuse this twin stick.
TAP SHIFT
The customer also wanted to be able to lock the transmission in 1st shift for down hill control. For this we went with Speartech parts and programming. This requires the switch as well as specific programming for the ECU and TCU. The switch will require you to add a pin to the transmission connector, this is easy and laid out in the Speartech instructions. In addition we added the gear shift indicator to show which gear the transmission was in.
ISSUES
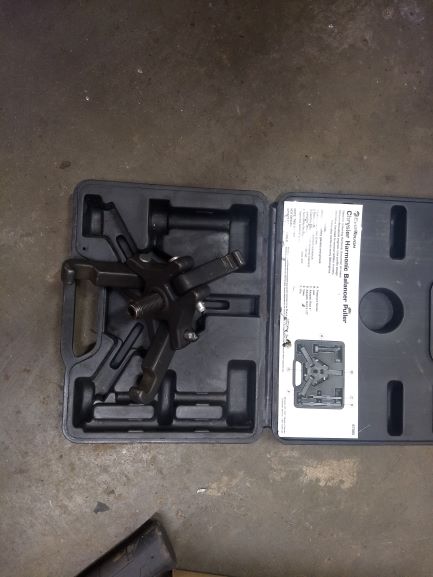
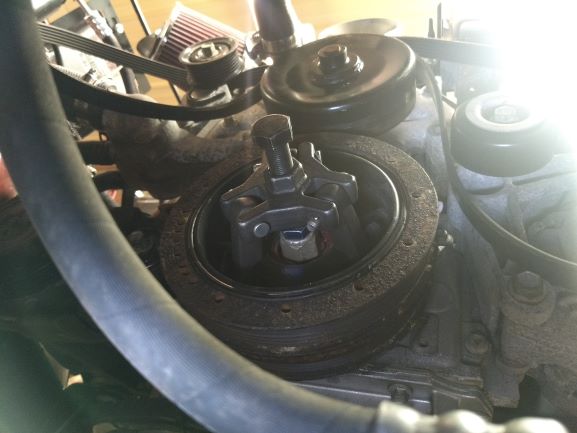
BAD HARMONIC BALANCER
Upon getting everything going we noticed a bad squeaking from the belts. Then watching the harmonic balancer we noticed it wobbled a lot. This is a common problem with the LS engines, where the outer portion of the balancer moves in relation to the center. Normally on harmonic blancers you have a couple holes that you can use to pull the balancer. On these, though, they do not. However there is a puller available to pull the balancer it may be listed as a Chrysler puller. We did have to use a bolt and nut to give the puller something to press against.
FINISHED PICTURES
LIST OF PARTS, VENDORS, PART NUMBERS AND COST
| Area | Description | Vendor | PN | Est Cost |
| Cooling | Radiator | Northern Radiator | 205054 | $360 |
| Cooling | Radiator Fan/Shroud Kit | R4L | $130 | |
| Cooling | Antifreeze | DexCool | AF888 | $40 |
| Engine | Motor Mounts | Advance Adaptors | 713088 | $140 |
| Engine | Power Steering Lines | Hoeners | $150 | |
| Engine | Oil Pan | Chevy Perf | 809-19212593 | $201 |
| Engine | Engine Wiring | S&S Performance | $295 | |
| Engine | Headers | Speed Engineering | 25-1029 | $300 |
| Engine | Exhaust Tube | Exhaust Shop | $100 | |
| Engine | Air Filter | K&N | RC-3600 | $60 |
| Engine | Muffler | Vibrant Performance | 231-1142 | $150 |
| Engine | Engine Oil | 5w30 | SYN5-30 | $28 |
| Engine | Oil Filter | Micro Guard | MGL57060 | $7 |
| Engine | Air Intake Coupler | Spectra | 9771 | $25 |
| Engine | Air Intake 90 | Spectra | 9781 | $15 |
| Engine | Upper Radiator Hose | Gates | 20843 | $20 |
| Engine | Lower Radiator Hose | Gates | 21706 | $15 |
| Engine | Gauge Kit | Dakota Digital | VHX-55J | $795 |
| Engine | Vehicle Speed Sensor | Novak | VSS01-4160 | $45 |
| Engine | LS Gauge Integration | Dakota Digital | BIM-01-2 | $100 |
| Engine | Fuel Regulator and hose fittings | Speedway | 91012800 | $102 |
| Engine | Fuel hose fittings | Amazon | $15 | |
| Engine | Spark Plugs | AC Delco | 41162 11978364 | $75 |
| Engine | Spark Plug Wires | MSD | 32819 | $85 |
| Engine | Exhaust Y Tube | AP Exhaust | AVY250 | $31 |
| Engine | OBD2 Splitter | Ebay | $14 | |
| Engine | MAF Extension | Ebay | $15 | |
| Engine | o2 Sensors | Rock Auto | $67 | |
| Engine | Fuse Block | LittelFuse | 350417BP | $19 |
| Engine | Fuel Pump/Sending Unit | Novak | FSK-CJNR21 | $345 |
| Engine | Tailpipe | Exhaust and Auto Center | $88 | |
| Engine | Hamonic Balancer, AC Belt & Tensioner | O Reilys | $241 | |
| HVAC | AC Kit | Jeep Air | $679 | |
| HVAC | 5/8 Heater Hose | Gates | 28401 | $15 |
| HVAC | Heater Hose Fittings and Clamps | Various | $48 | |
| HVAC | Bolts | Mcmastercarr |
-------------------------------------------------------------------------------